How to Start a Veggie Garden from Scratch - Beginner Friendly Guide!
Growing my own veggies is one of my favourite things in life. All the time spent outdoors being surrounded by plants bring me so much joy, raising little plants from seedlings to harvest. But did you know growing your own veggies is also good for you and the environment? Whenever you buy veggies from the supermarket, there’s a high chance they’ve travelled hundreds or thousands of kms to get to you. These ‘food miles’ mean that by the time your food reaches your home, a lot of pollution has been created through transport fuels. Not to mention when you buy out of season food (like tomatoes in winter), that these have probably been picked long before they were ripe and stored in cold storage for later. If you grow your own veggies, you can prevent unnecessary energy/pollution use and also grow locally produced (fresh from your garden!), seasonal food. This produce is often tastier, more nutritious and you can grow them organic!
Ever since I posted about our veggie garden that we had been building over the past year, a question I get asked time and time again is:
‘How do I start a simple veggie garden?’
When I was studying for my permaculture design certificate last year, I learnt a lot about what makes a good garden bed for growing food at home, so I’m excited to be able to share some of this knowledge with you. Today, I’m going to show you how to create a simple, budget-friendly veggie garden from scratch!
This is a beginner friendly guide and is super easy as it uses pre-made raised beds. Plus, all products can be found at your local Bunnings making it super convenient as you can shop for everything in one place. And during these times impacted by coronavirus, Bunnings are also offering a convenient drive & collect service where you simply shop online, park at one of their designated drive & collect bays and you’ll have your order placed in your car, contact-free!
So let’s get started!
YOU WILL NEED:
A few large cardboard boxes (as plain as you can get, no glossy types please!)
9 bags of organic compost, 25L size (if you have homemade compost, you can use this too!)
8 bags of cow manure, 25L size (you can also use chicken or sheep manure)
1 bag of pea straw mulch
A hand trowel (this is a mini hand shovel)
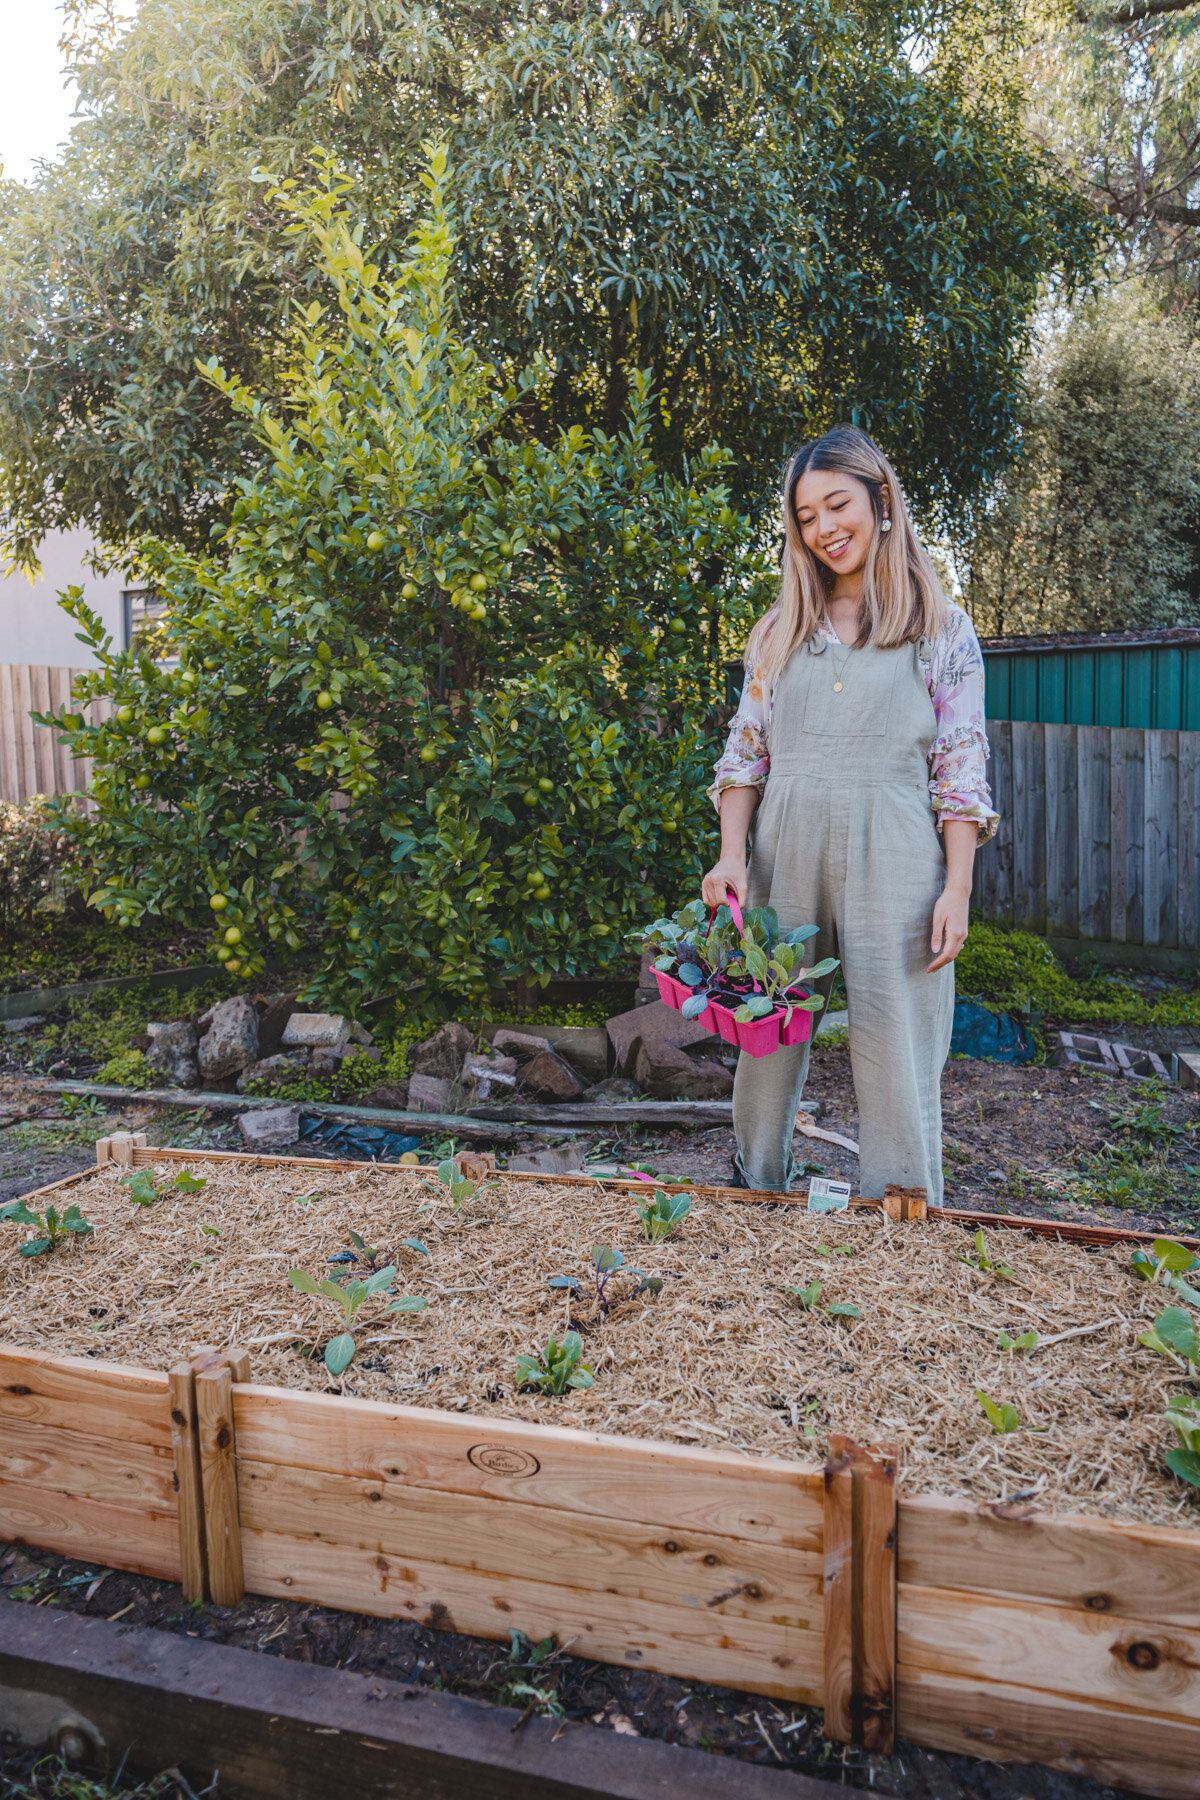
Assorted veggie seedlings (I planted 25 seedlings total)

Step 1: SITE YOUR LOCATION
The best place to start a veggie garden is a sunny spot in your garden. Watch how the sun falls in your garden during the day and choose a spot that has the maximum amount of sunlight hitting it throughout the day. Also, take into account what’s convenient in terms of accessing your veggies for watering, maintenance and harvest.
The veggie bed we will be building today is 2.4m x 80cm in size, so mark this out to see how it looks.
You can set up your raised bed on top of existing lawn, dirt and even concrete, but make sure the surface is flat or that you’re able to even it out so that it is flat.

Step 2: SET UP YOUR RAISED BED KITS
I chose the Birdies Heritage range for this beginner’s tutorial because they’re modular and can be arranged in so many different ways to suit your needs. When you purchase two 80x80x30cm Birdies Heritage raised beds, you actually have the option of arranging then so that you can get three raised beds worth of space which is awesome. You can also stack two boxes on top of each other if you want to create a 60cm tall box, or buy additional kits later on to expand the size of your veggie garden.
For this tutorial, I’m using two Birdies Heritage range boxes but taking advantage of their modular design to create a triple-sized 30cm high raised bed measuring 2.4 metres in length and 80cm in width. The set up of these beds is self-explanatory. The posts used have grooves which you can slide the timber panels in. There are no screws/drills etc required!
I recommend 30cm tall raised beds for beginners as they’re cost efficient in that you need to buy less stuff to fill it with. Plus, 30cm is more than enough space for most veggie roots. If you change your mind in the future, you can simply stack another Birdies Heritage kit on top of your existing beds to change it to 60cm! This is why I love the idea of this range so much.

Step 3: LINE THE BOTTOM OF YOUR RAISED BED WITH CARDBOARD BOXES
Before we fill our new garden bed, we’re going to line the bottom with cardboard boxes. This is especially important if you’re setting your bed on top of your lawn or dirt, as the cardboard will smother all the grass (sorry not sorry!) and weeds so they don’t steal the nutrients and take over your new raised garden bed. When using cardboard boxes, try to choose ones without glossy finishes - as plain as you can get is best! I saved my cardboard boxes from packages I received in the mail.

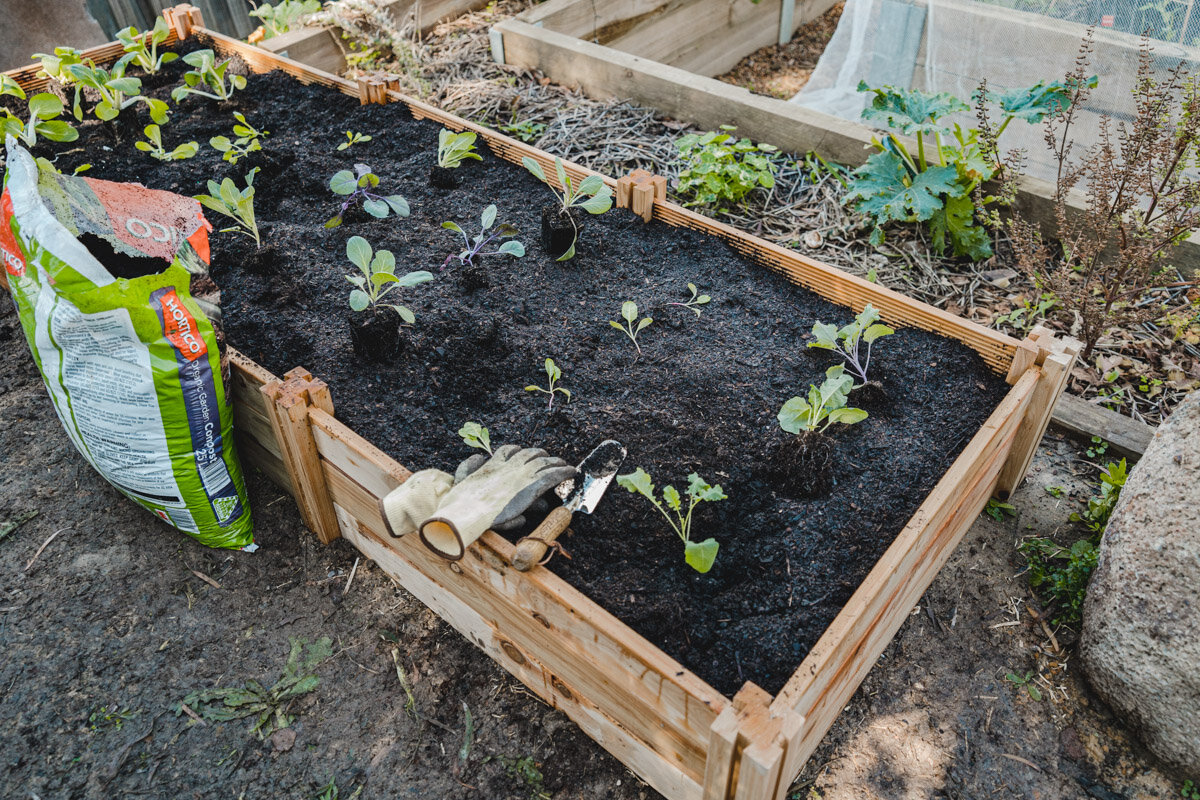
Step 4: LAYER YOUR SOIL
We’re going to fill our boxes with the no-dig method, also known as lasagne gardening. This is a permaculture method of filling your garden beds and is based on the idea of basically creating a really nutritious compost-style heap within your garden bed! Basically what we’re going to do is layer all sorts of nutritious things for the garden and over time, everything is going to break down in your bed to create super nutritious soil. As you add your layers on, water each layer in so everything’s wet.
For our 30cm triple-size garden bed, I recommend the below layers:

For each pea straw layer, I used 1/3 bag of pea straw. For each compost layer I used 4 bags of 25L compost. For each manure layer I also used 4 bags of 25L manure.
Make sure you keep one bag of compost on the side as we’ll need it for later.


Step 5: WHAT SHOULD I GROW?
For beginners, I highly recommend starting off with seedlings rather than seeds. Seedlings will help build your confidence in growing veggies as the early stage of looking after a fragile freshly sprouted plant has been taken care of for you.
For us Aussies in temperate regions who are heading into (real) winter, the best things to plant right now are winter seedlings which are mainly all your leafy greens! Some easy to grow plants that I recommend for first timers are:
HIGHLY RECOMMENDED FOR BEGINNERS: bok choy, pak choy, wombok, kale, rocket, lettuce, spinach - these types of plants are ‘cut and come again’ kinda plants in that you simply pluck off the outer leaves of the plant and they’ll keep growing and provide you with a continuous supply until the season is over. They’re also on the smaller side so you can plant a lot more. If you want to build your confidence, definitely get these veggies in - you can find all of these at Bunnings.
Cabbage, cauliflower, broccoli, broccolini: these types of plants are also pretty easy to grow however they take up a bit more space/time. For example, one cabbage and cauliflower seedling will only produce one cabbage/cauliflower. One broccoli seedling also only gives you one broccoli head, however with some varieties you do get small off-shoots. Broccolini produces lots of broccolini heads however it does take a little longer to grow and is a larger plant compared to the highly recommended list above.
Brussel sprouts: they are super fun to grow (you should google it to see what this plant looks like!) but definitely take up lots of space, so take this into mind.
Snow peas & broad beans: these are fun but are climbing plants (especially broad beans which get huge) so you will need to arrange vertical trellises and set-ups!
Spring onion: I always have to recommend this! If you like spring onion, this is hands down the easiest thing to grow. No need to buy any seedlings, just buy a pack of spring onions from the shops, cut off near the roots and plant in your garden.
Please note, the below plants are a general list of summer veggies and should not be planted if the weather is cold as they won’t grow: tomatoes, eggplants, cucumbers, capsicums, zucchini, pumpkins, squash, corn!


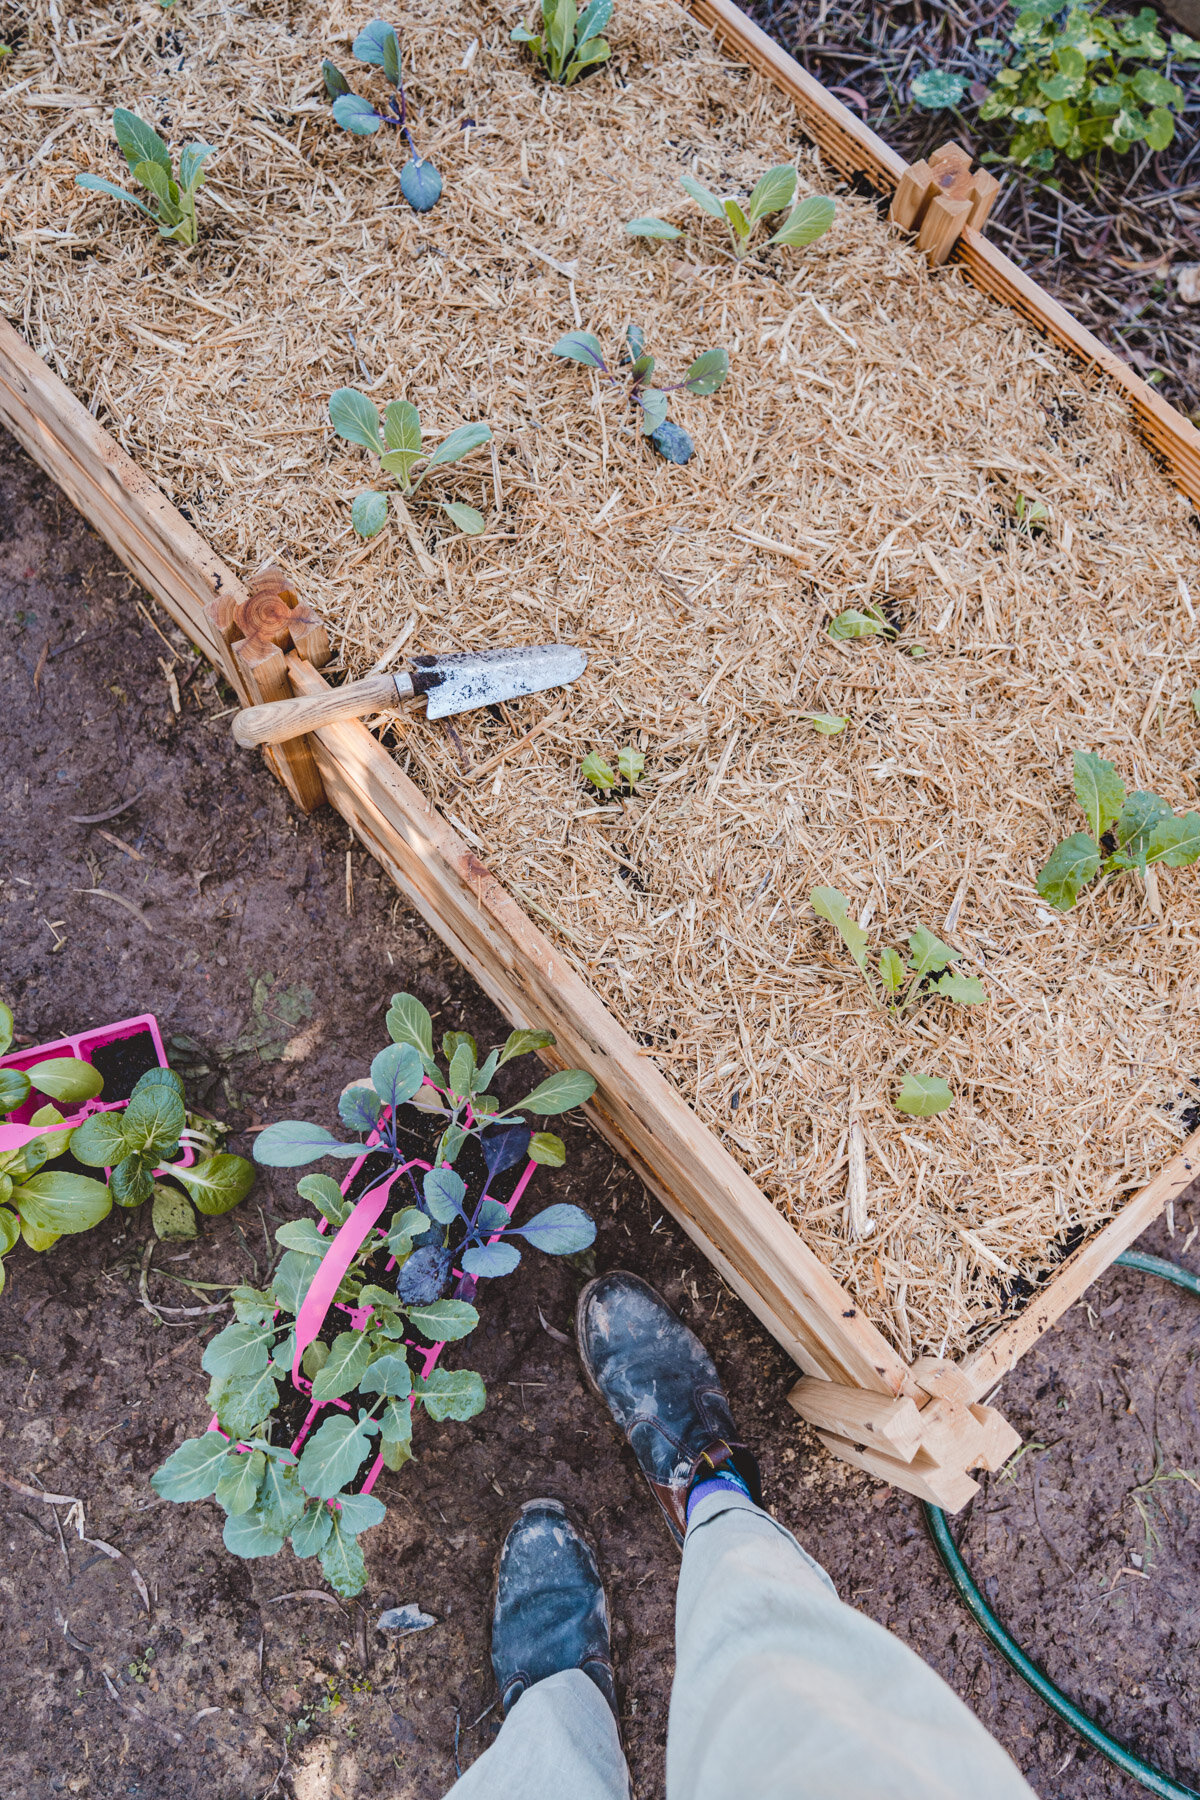
STEP 6: ARRANGE YOUR SEEDLINGS
It’s time to arrange your plants! Check the back of your seedling punnets to find out how much you need to space your plants. After a couple of growing seasons, you’ll be able to intuitively arrange as you’ll know how big each plant gets.
For my veggie box, I’ve planted:

STEP 7: PLANT YOUR SEEDLINGS
Using your hand trowel, dig a hole slightly bigger than needed for each seedling, pop your seedlings in the hole, then fill up the remaining space around the seedling with your last bag of compost. This is really important because as we’ve gone with the no-dig method, the super nutritious cow manure layers in your garden bed might touch the tender roots of your seedlings and burn them. So by using compost around your seedlings, it keeps them safe whilst they are young!


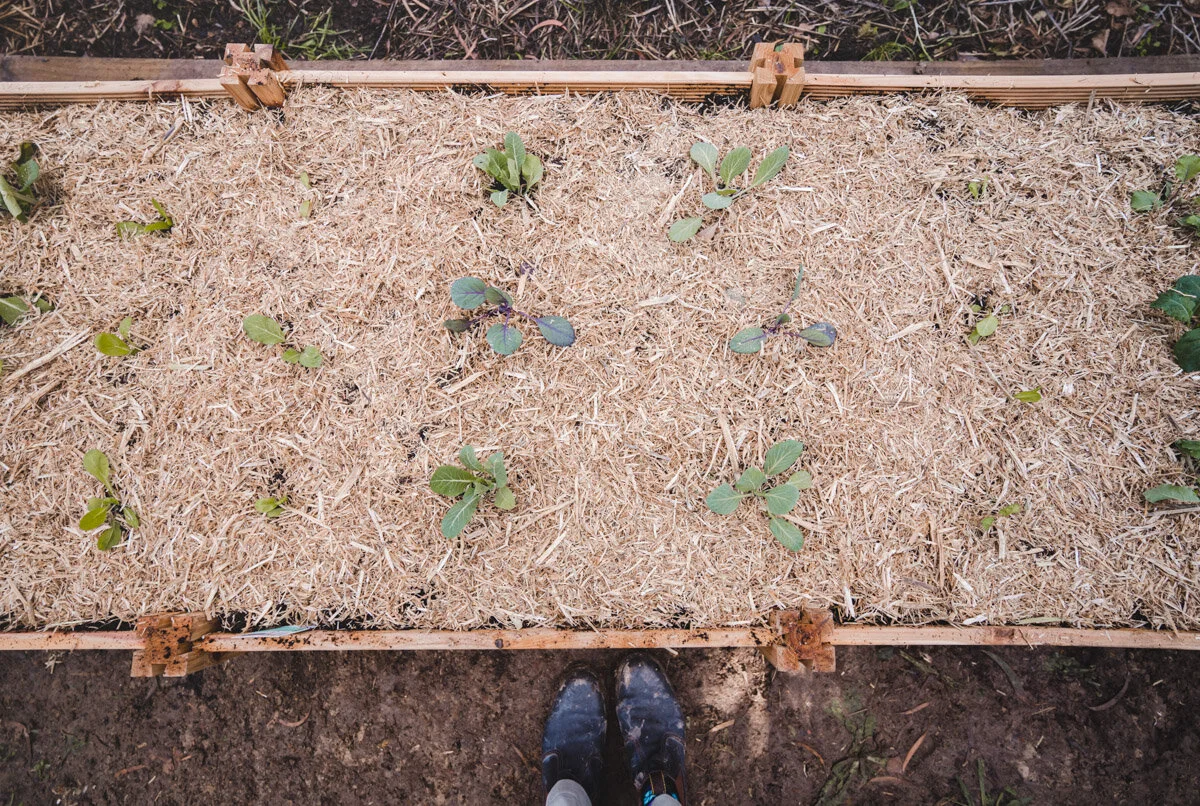
STEP 8: MULCH WITH PEA STRAW
Once you’ve finished planting your seedlings, mulch your garden with a generous layer of pea straw. This helps keep the moisture in your garden so that water doesn’t evaporate too fast and also helps suppress weed growth.
STEP 9: WATER YOUR SEEDLINGS IN
It’s time to water your seedlings! Right after transplanting seedlings, water them in with Seasol (or seaweed fertiliser) diluted with water. This helps with transplant shock and gives your plants a good start in their new home.

STEP 10: ENJOY AND WATCH IT GROW!
Congratulations, you’ve just built your very first raised veggie bed! Make sure you water your garden regularly and get ready for harvest in a couple of months time!
During this season, keep an eye out for white cabbage butterflies and caterpillars who will most likely quickly become your number #1 gardening enemy! They lay tiny creamy-yellow dotted eggs on the underside of leaves. In my next tutorial, I’ll be showing you how to build a DIY net structure above your bed to keep them away.
Happy gardening everyone and if you do follow this tutorial I’d love to see your efforts!

