Veggie Garden Enclosure DIY + Before and After Pics!
We’ve finally finished our Veggie Garden Enclosure for our veggie patch and I’m super excited to share the before and afters & a run down of how we built this ourselves!

We built a veggie garden enclosure over our veggie patch to protect our veggies from butterflies (caterpillars), rats and possums and I’m so happy with how it turned out. But to be honest, I umm-ed and ahh-ed about whether or not to build an enclosure over the veggie garden since we even started building our raised beds two years ago because I love the garden feeling like an open (plan?) space. In my original plans, I had thought about including an enclosure as part of the build because I always grew up with a veggie patch with an enclosure on top (it’s the most efficient way to deter critters with minimum effort), but when we got started, it felt like just one too many things to deal with so I decided to let it go and just focus on building the patch and seeing how things went without an enclosure on top.

Wearing: Spell Capulet Broderie Anglaise Frill Smock Dress | Will and Bear hat | Merry People Bobbi gumboots in pear green
In our first year of growing veggies, I mainly focused on using natural measures to deter my pests. Peppermint oil repellent for rats, putting our papillon’s hair (lol) in the patch for some predatory scent (lol, did not work), leaving a pile of food at the corner of our garden outside the patch, netting the produce and handpicking caterpillars with tweezers (super lol, but at least it worked). Some of the methods worked, some didn’t and we lost a lot of food especially to rats which would literally just bite through the netting and steal entire plants top to toe. It made me miss having a garden like at our family home where it was fully enclosed and everything was safe. My dad had no problems at all growing his delicious tomatoes and I was totally envying the fact that cabbages that got the same start survived in his garden but were stolen in mine! So, I decided it was time to work on designing our enclosure and that hopefully, we can at least make it look cute (more to come!)

WHY BUILD AN ENCLOSURE?
We decided to build an enclosure over our veggie garden to:
protect our garden from butterflies/caterpillars, birds, rats and possums
save the stress & heartache of waking up each morning and wondering if our almost-grown cauliflower was still there
save time by not having to deal with manual pest control methods which sometimes need to be applied/reapplied daily
There were also a couple of secondary benefits to building an enclosure that swayed me into deciding to put one on top of our veggie garden:
You can use the walls of your garden enclosure to support vertical climbing plants, increasing your growing area!
You can use the walls of the enclosure to hang decor (fairy lights, etc) to make it pretty
It took us months to design our veggie garden enclosure and whilst sifting through Pinterest for inspiration and going through various ideas and designs, I decided I wanted our enclosure to have the below criteria:

veggie garden enclosure CRITERIA
It should be 100% rat/mice proof, so it should use wire mesh
It should keep the pests out (Butterflies, rats, possums), but still allow beneficial insects in (bees, ladybirds, etc)
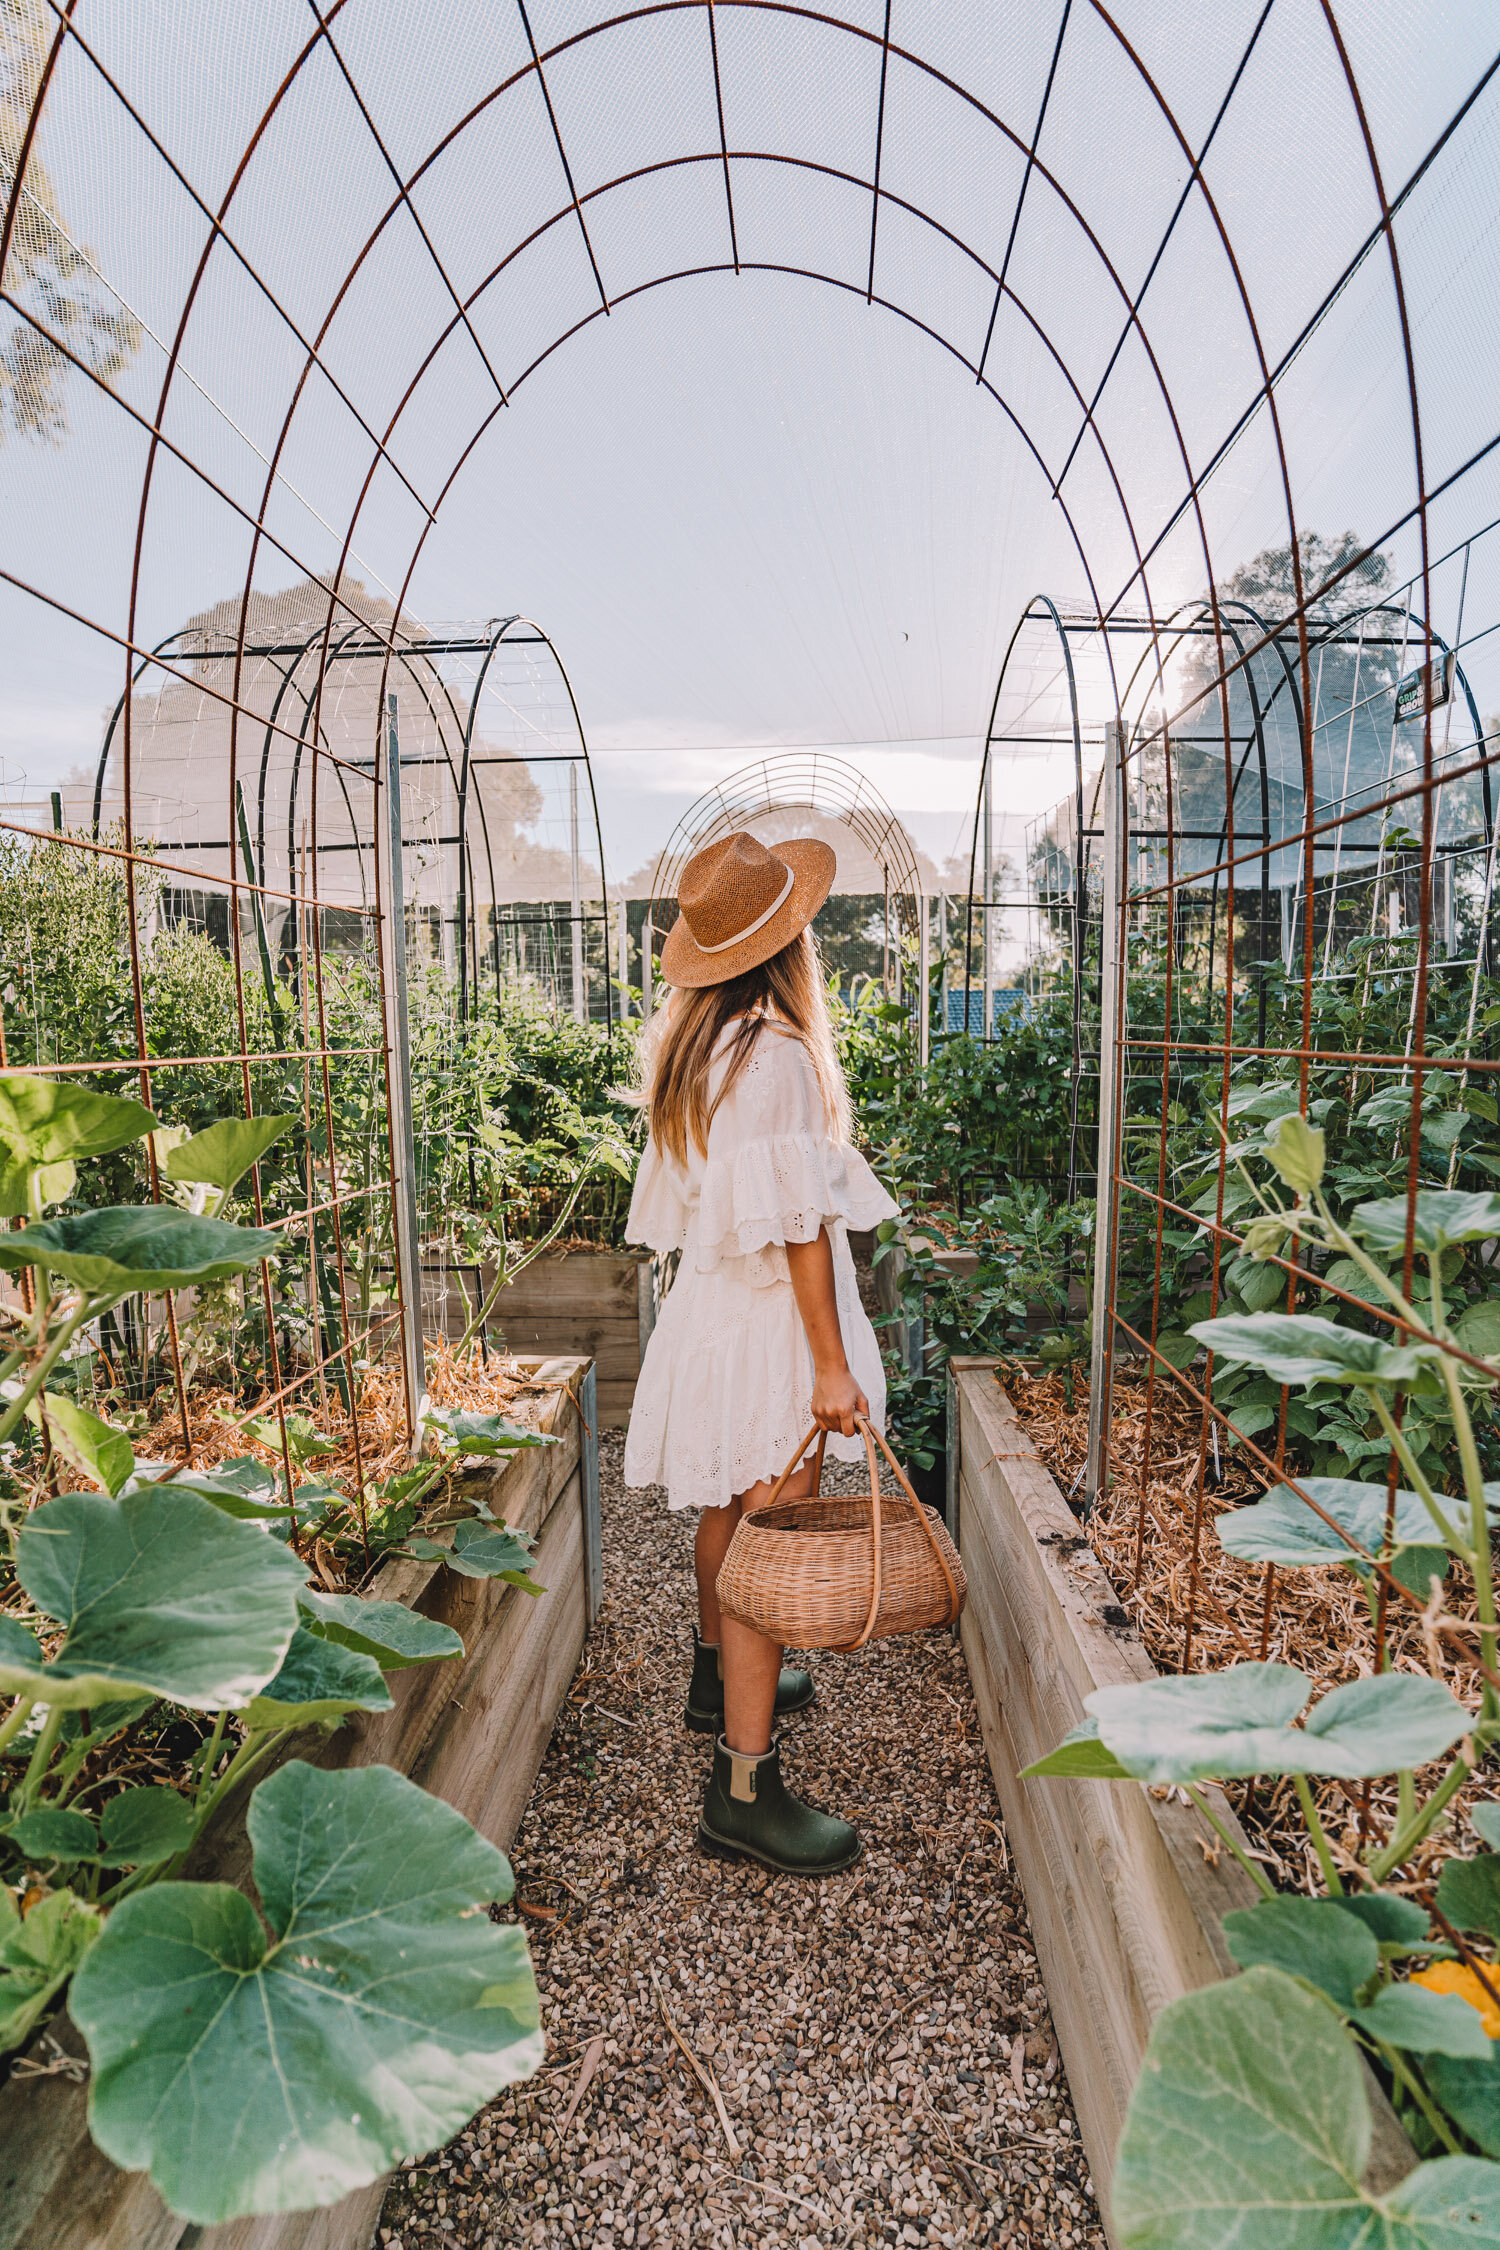
It should be spacious in height, so we made sure the heights were right - the lowest point is around 1.8m tall and the highest point is around 2.6m tall in the middle - but we only went that high so that we could make sure there was enough clearance (20cm) above our arches
It should be easy to build and reasonable & achievable
It has to look good enough
I did this project with my dad (my parents already have a similar set up at home). After drawing up various plans and considering all the different types of materials we could have used to make it, we finally ended up on an agreeable idea. Check out the before and afters below - I’ll go through a full run down on all the decisions and why we made them too!

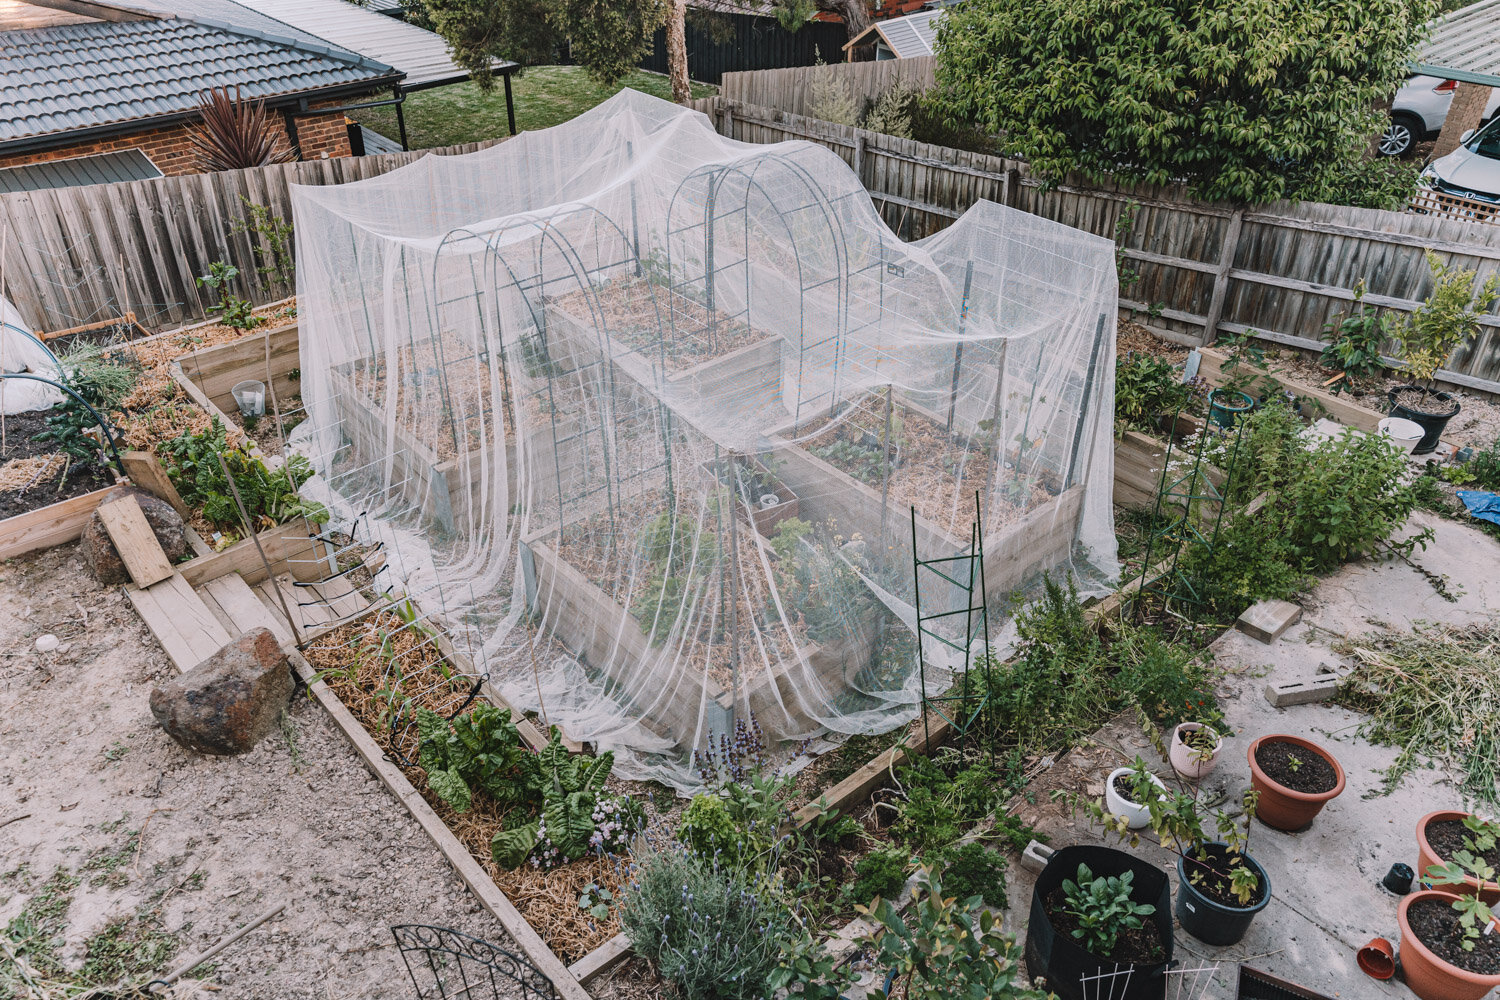
BEFORE AND AFTER
Please excuse the mess - this garden is forever a work in progress!

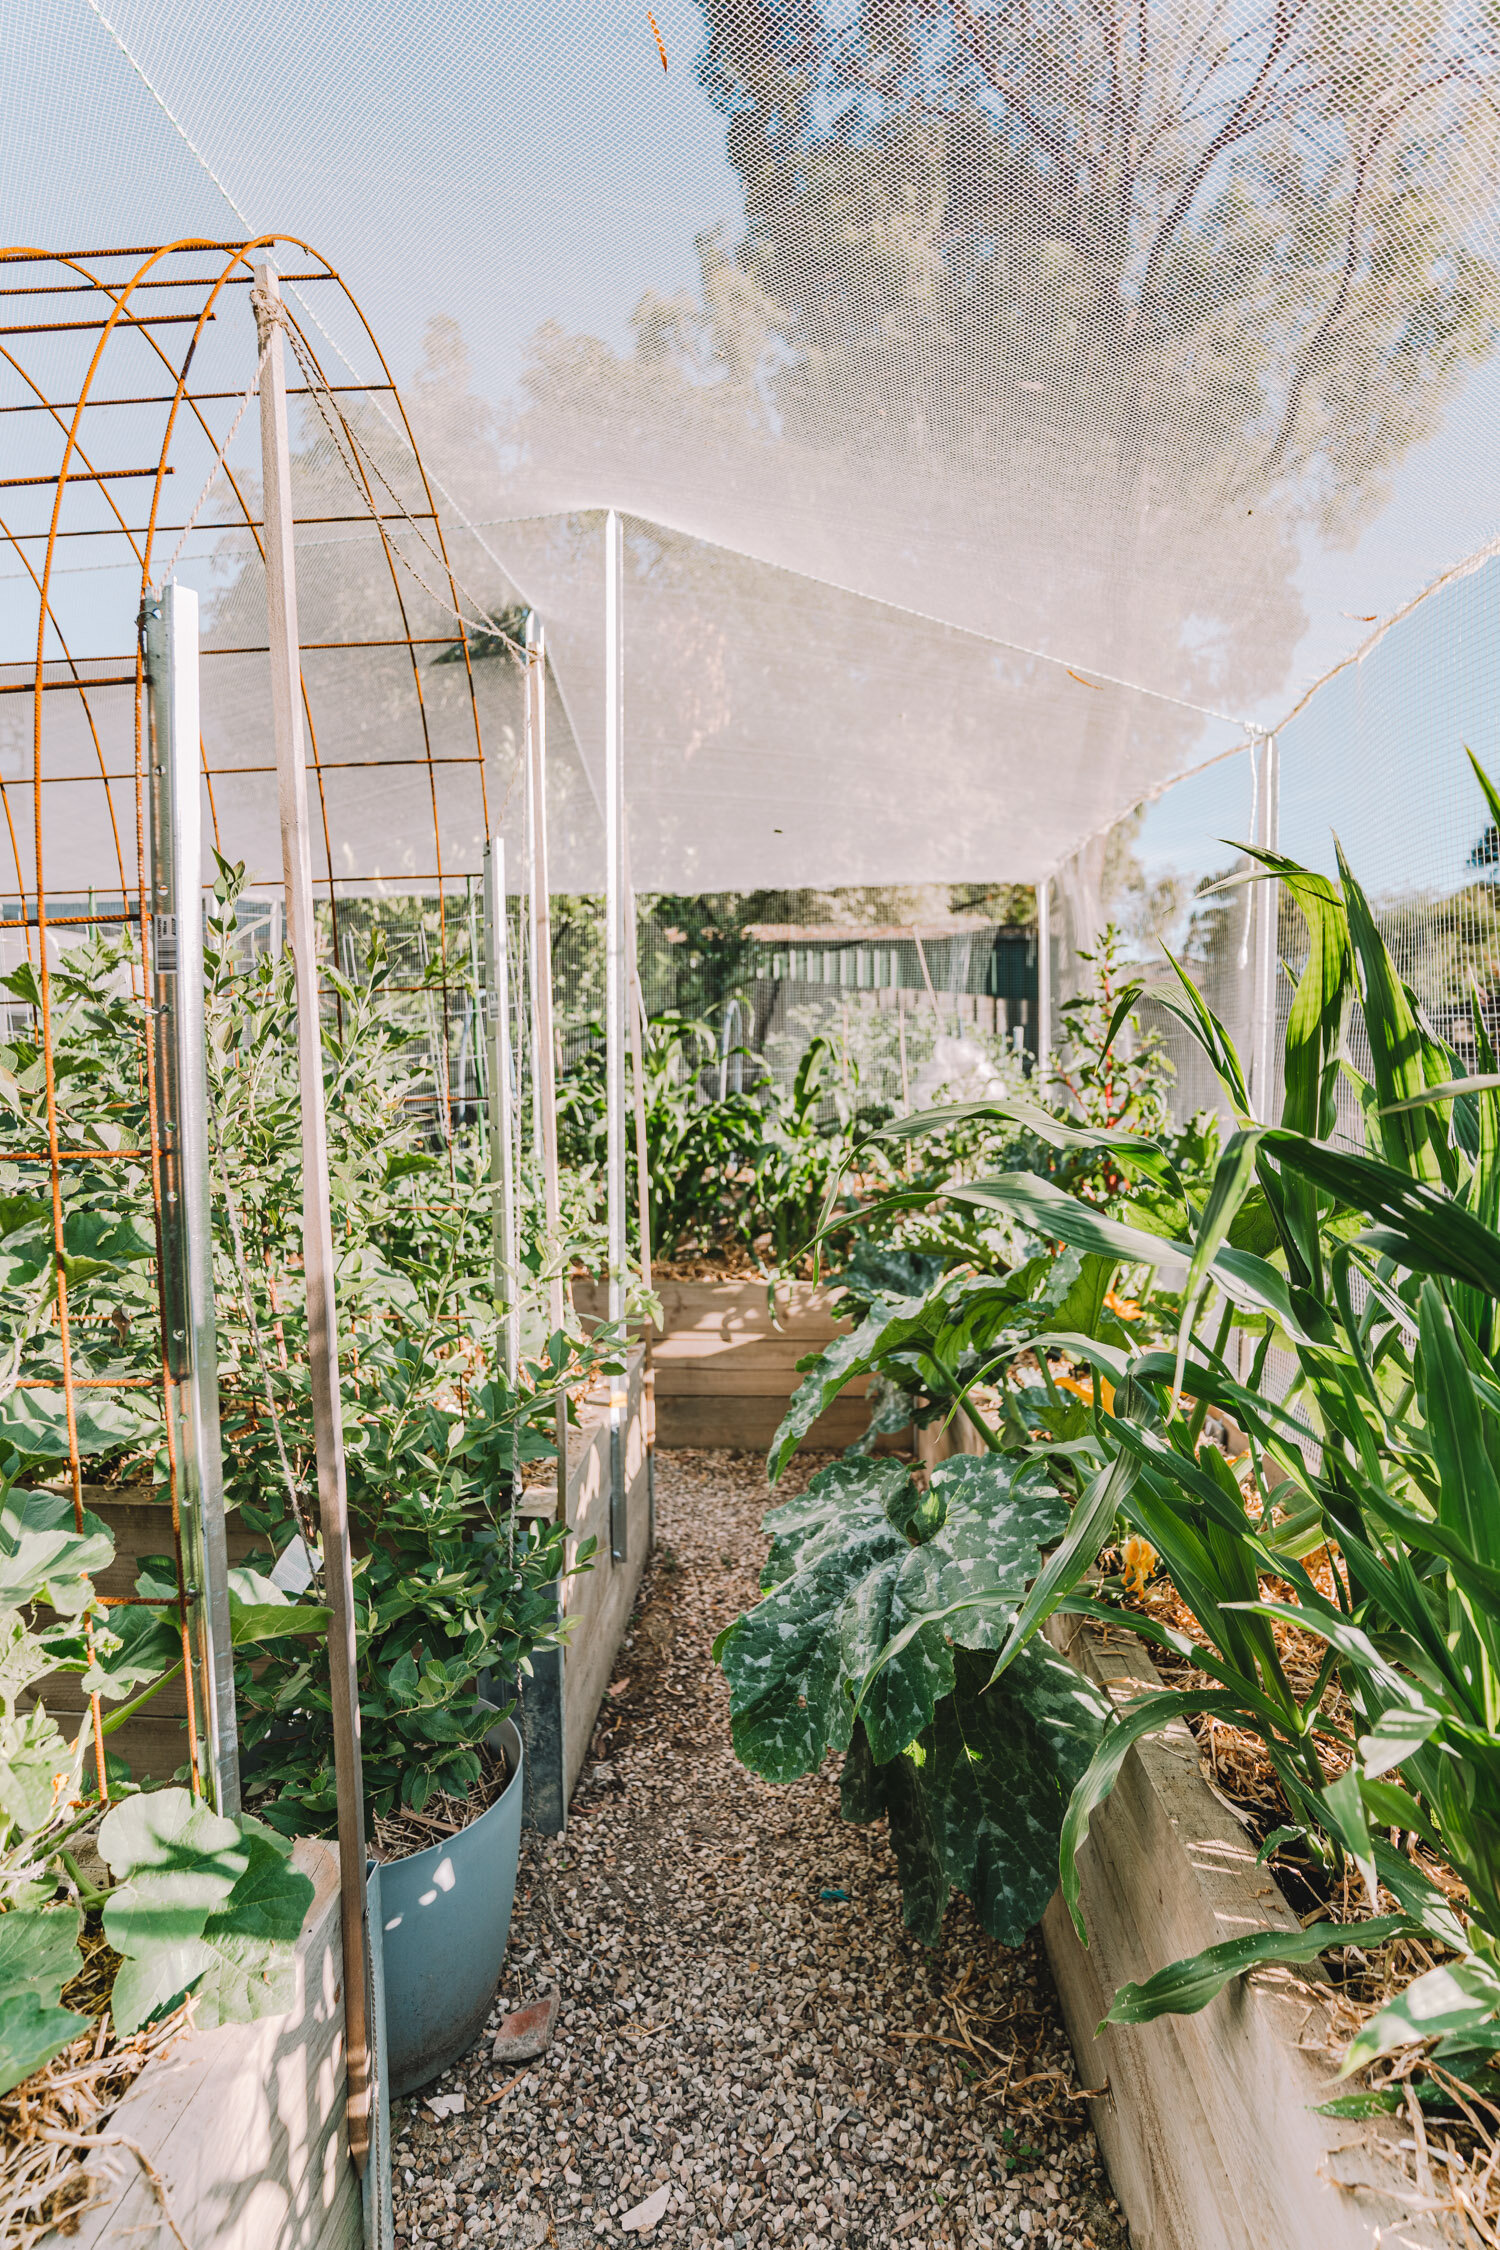
INSIDE OUR VEGGIE GARDEN ENCLOSURE
I know right!

THE DETAILS / HOW WE DID IT!
FRAME FOR THE WALLS:
To create the structure of the external walls, we used Whites galvanised steel posts spaced approximately 1.5-2 metres apart. When using the posts, we actually used them upside down to take advantage of the pre-drilled holes so that we could easily attach them to our raised beds with timber screws. We overlapped the posts with the timber around 20-30cm for sturdiness.
WALLS:
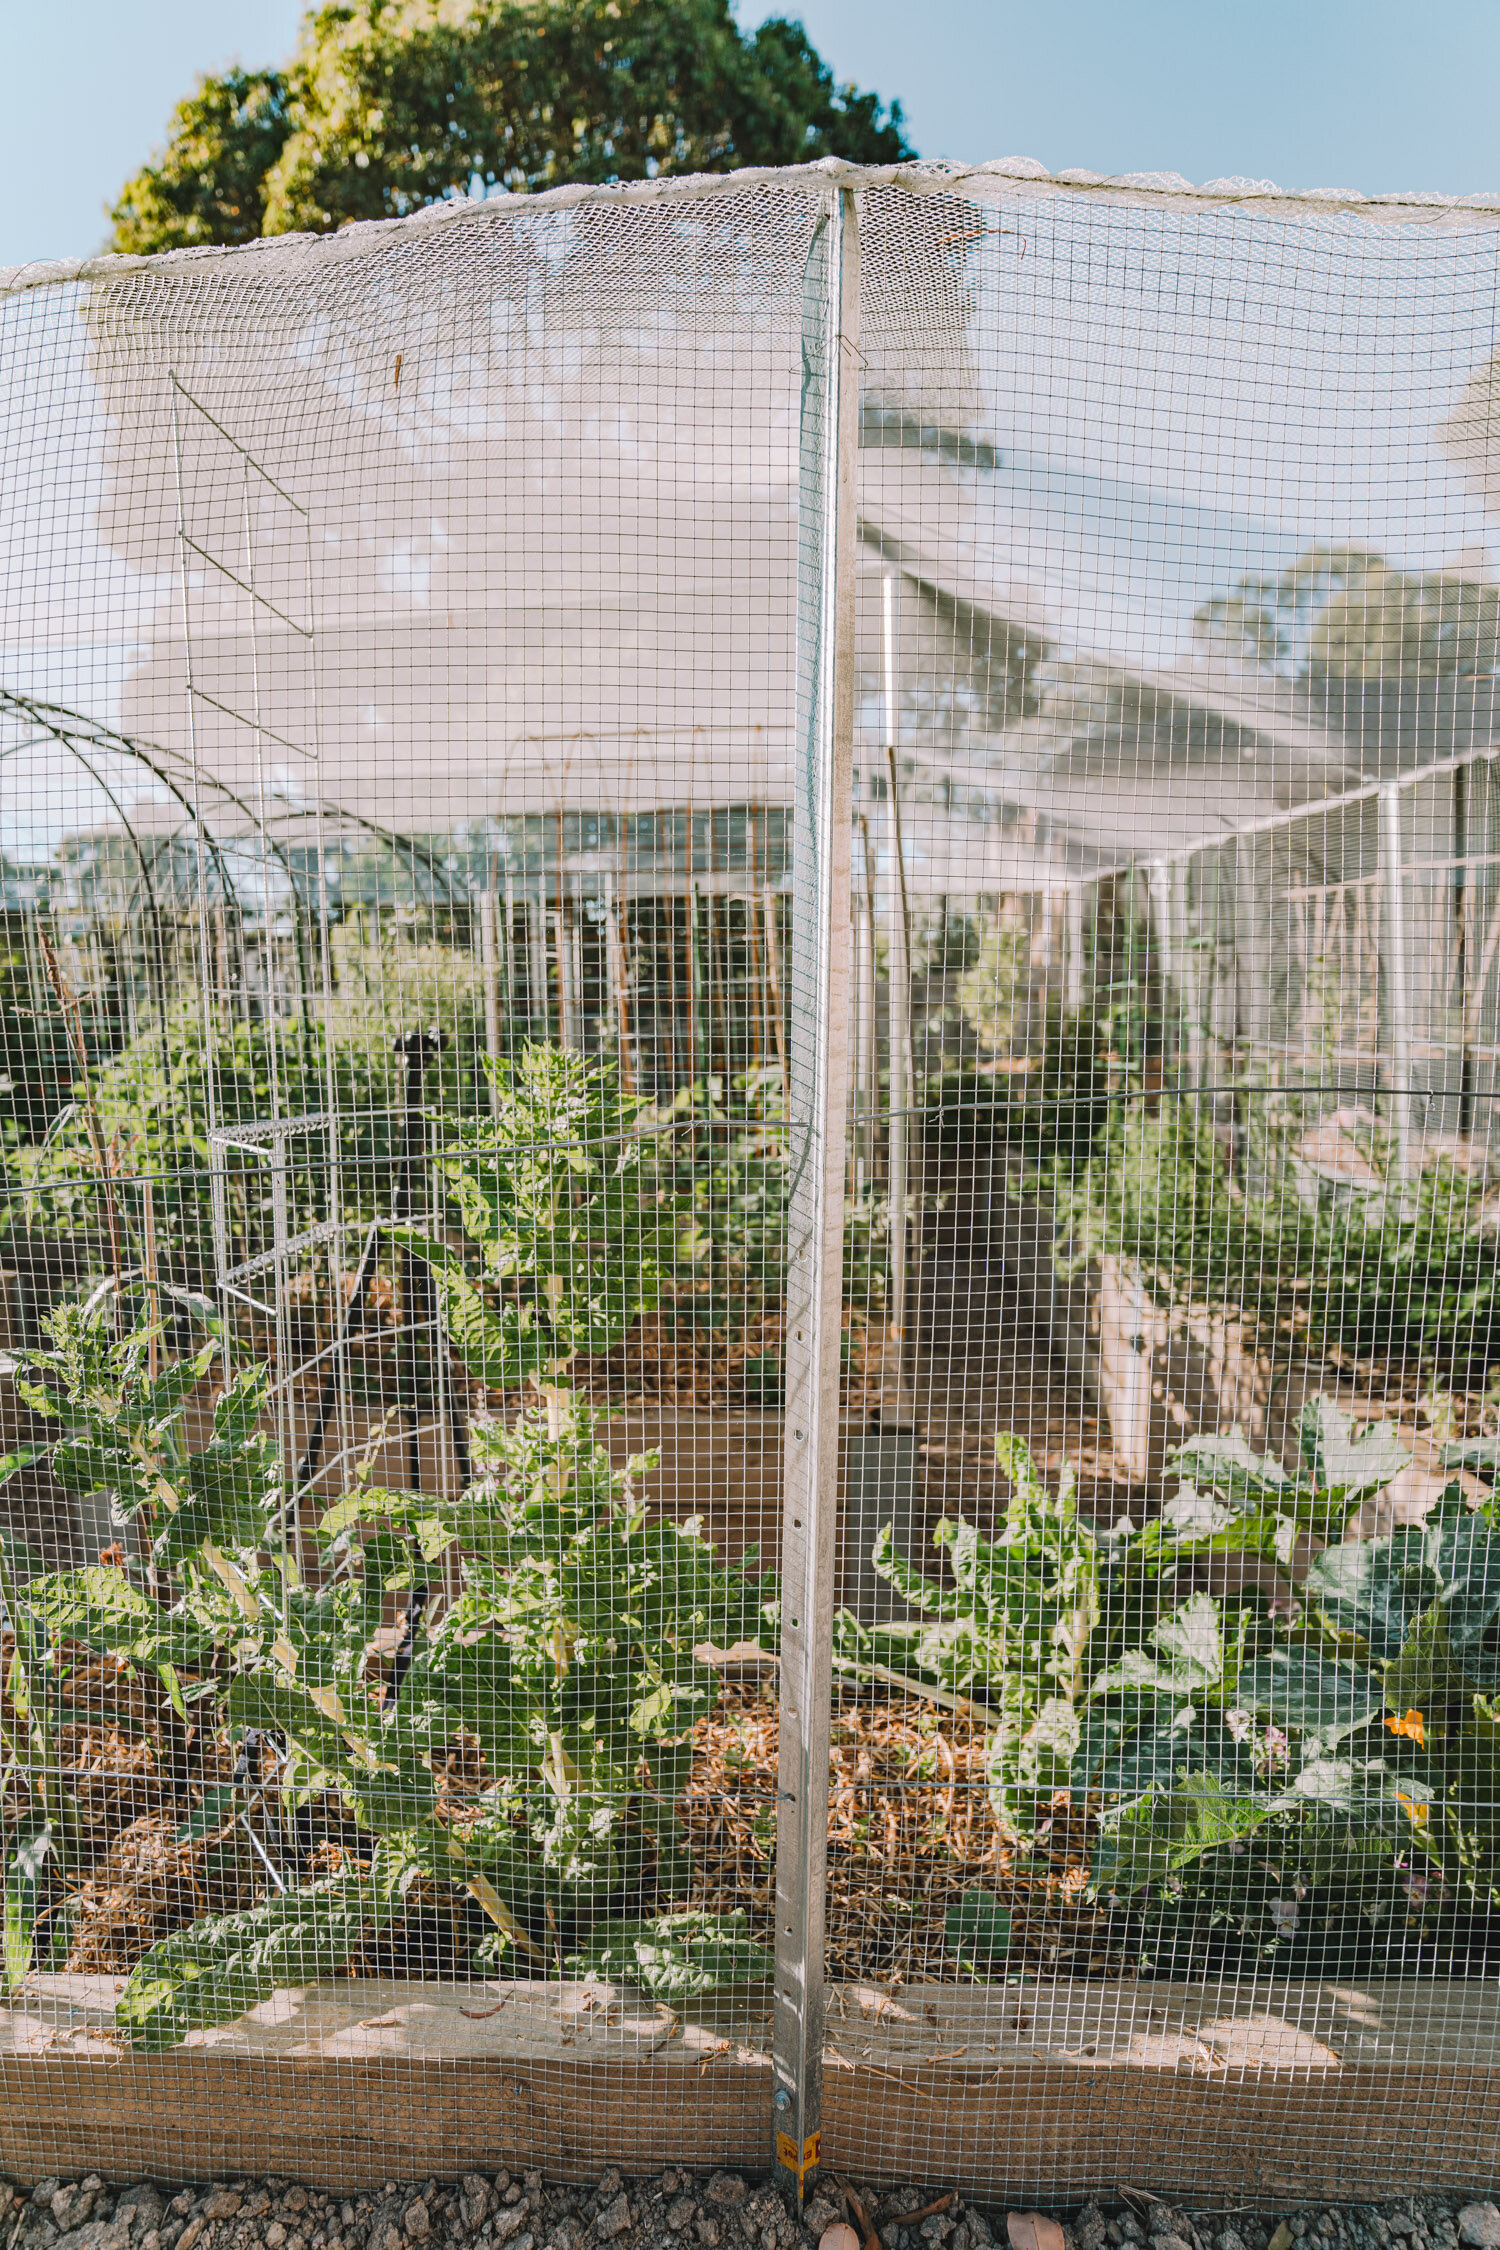
Choosing the material to cover the ‘walls’ took some time. Most enclosures I’ve seen online use either netting which doesn’t really deter rats as they’ll simply chew right through it or chicken wire which whilst strong had holes big enough for rats to climb through.
After browsing all the different types of options out there, I settled on using Whites 12mm aperture aviary mesh. The 12mm size was the best balance between keeping out rats, possums and butterflies but also big enough to allow ladybirds and bees in. The height of the aviary mesh used was 180cm height so that it was tall enough to cover the walls and create a 15cm overlap over the garden beds to make sure there were absolutely no holes. We attached the aviary mesh to the fence posts using Whites HandyPak galvanised tie wire and secured the mesh to our garden beds by using fencing staples.
The aviary mesh was perfect! It was lightweight enough to use as walls and also made the structure feel so secure compared to if we were to use netting along the walls. Further, when viewed from afar, you can’t really see the mesh much so it blends in quite well into the garden.
As aviary mesh only has a certain level of structure to it, we reinforced the walls by using thick 3.15mm galvanised tie wire to add horizontal support across the middle and also on top of the galvanised posts - we used an angle grinder to cut a wedge into the top of the posts so that we could secure the wire on the top.

FRAME FOR THE ROOF:
To create the structure for the roof, we secured around 8 Whites galvanised posts onto the four central raised garden beds. These sat taller than the exterior wall posts to give ample clearance for the four sets of arches we have inside the garden. The amount of clearance we gave the arches was around 20cm so that there was enough room for plants to climb across the top of the arch without being squished by the net.
As for the horizontal support on the top, my dad’s smartypants idea was to use extremely, extremely taut UV protected outdoor rope (we used this one here) to create the structure. He had the same set-up in his garden for over 7 years now and it’s been going strong. This way, the roof structure is super lightweight but still strong enough to hold the net on top. The rope actually magically balances on top of the posts but we’re going to put a plastic cap or similar on top soon so that it won’t wear out.

ROOF:
For the roof, we used a 10x10m Anti Bird Net that we already had. I thought about putting the same aviary mesh across the top in case some determined rat wanted to climb up and bite their way through but using a net ended up being the most practical solution. My parent’s enclosure also has a netted roof and so far (for 7 years) they’ve haven’t any problems so I figured I’d be fine with it too. The net was cut to size and carefully connected to the walls by weaving through thin galvanised wire (these Whites HandyPak wires is what we used).


DOORS:
The doors were definitely a bit of an engineering feat! This was beyond me and my dad designed them himself. They’re made of steel angle pieces and attached with hinges to the posts. We created simple latches using wire and leftover pieces - we had to do a latch on both sides of the door as the aviary mesh means we can’t reach through to access the latch from the inside.


INSIDE THE VEGGIE GARDEN ENCLOSURE!
With our veggie garden enclosure looking mighty fine, everything inside feels so much safer and I’m growing all my faves with confidence! Our summer garden is filled with sweet corn, zucchini, tomatoes, tromboncino, pumpkin, cucumbers, beans, eggplant, capsicum and more. So many of these veggies would be eaten as soon as they were ripe by rats and the like so this year I’m feeling a lot more relaxed knowing that my veggies are going to be 1000 times safer than they ever were!


We started building the veggie garden enclosure around mid-November after stage 4 restrictions finally ended in Melbourne and so it took around 4 weeks to finish the entire project (of course, we didn’t spend every day on it, only a few days max a week). And I’m soooo pleased with how it looks! It looks way better than I ever imagined a DIY veggie enclosure could look, it’s super spacious inside, feels super sturdy for our needs and most of all, I feel so confident in growing all the delicious veggies that previously would get stolen!
I hope you guys find this post helpful if you’re ever thinking of creating a veggie garden enclosure too!